Wednesday 16 May 2012

Composite Sheet Module 1 Stars

Stars Composite Sheet

Looking through my portfolio of work, the recurring motif that emerged was the 'estoile' or curved ray star. The star with three rays- a relatively simple shape- lent itself to numerous variations in the cut and fold exercises.
By orientating it differently or changing the way the paper was folded, I could produce infinite derivative
shapes.

Monday 14 May 2012

Inlay Applique Chapter 10

Counterchange Sample 2
Felt squares


I started with 4, 71/2cm squares of felt which I decorated by bonding threads, fibres, braids and ribbon. I then drew my design and cut out the pieces to use as a pattern. I wanted to use a shape with curves but this made the use of wider insertion stitches impossible.

Pattern


Segments swapped over

I used a large cross stitch and a fine perle cotton to reattatch the outer layer. Second
was a plain antique insertion stitch in a medium perle. Next came a laced insertion stitch with metallic thread and finally, in the centre, a further round of antique insertion in a medium perle.
The 'fit' with this technique is obviously all important but I found the felt has a certain amount of play. I'm still not totally happy with the Wonderweb I'm using and dont like the residue it seems to leave. I am looking for a subtler alternative -any suggestions?


Counter-interchange Sample 3
Estoile based pattern 
I decided to go for a purple/gold combo for this sample and chose a design I'd developed from my estoile motif in the cut and fold exercises. I found it really useful to go back to my counter/interchange paper exercise too. I chose a simple curved rhombus motif for my
supplementary shape.
I chose my hand dyed and overprinted cotton and 2 gold shades of organza for my fabrics and bonded them in varying combinations to a felt backing. Each square is 7.5cm.


Pieces swapped around
The outer edge of each new shape was outlined with running stitch using stranded
cotton, while the middle rhombus were attached with a simple antique insertion stitch in stranded or mercerised cotton. I used a machine feather stitch to join the squares together and decorated the shapes within the rhombus with a small heavy
machined cross stitch using variegated rayon.
I think this piece is neater than the previous one and particularly like the effect of the marbled fabric and shaded machine stitching.

I've enjoyed this chapter as it has been another excellent opportunity to try new techniques.

Inlay Applique Chapter 10

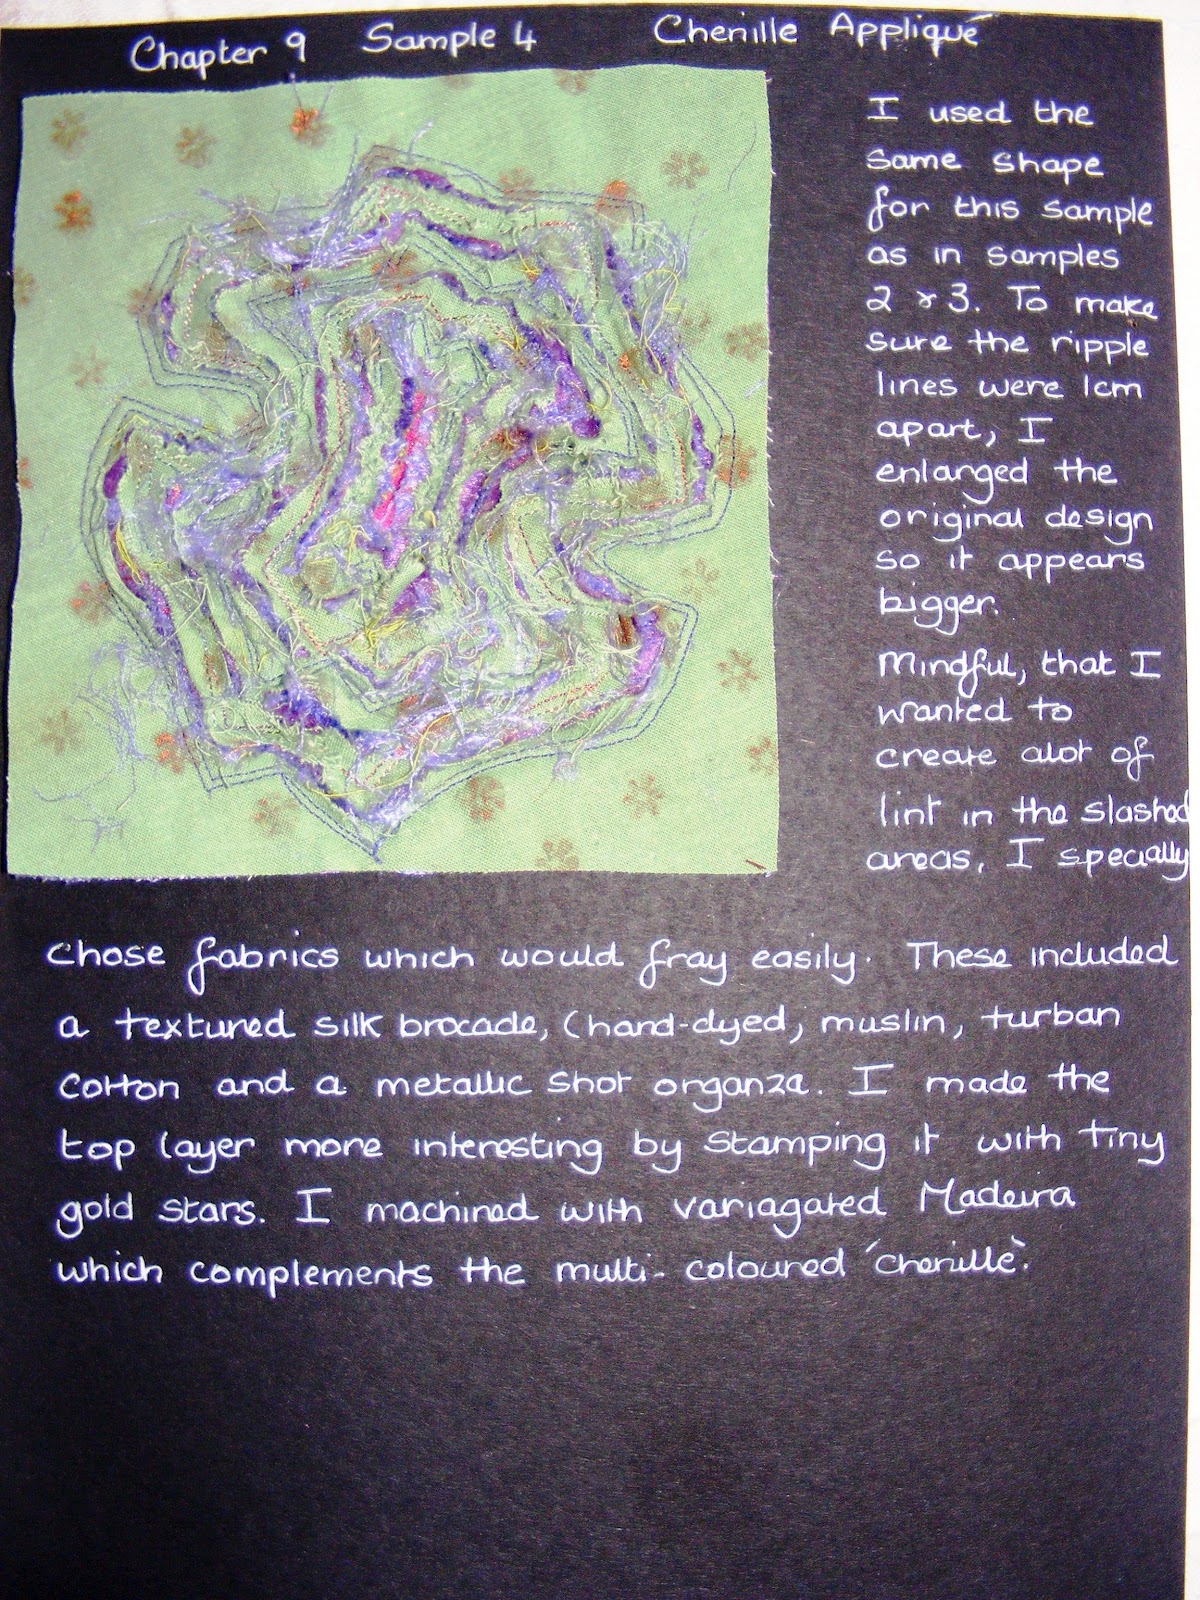
Hand insertion stitches
Insertion stitch Sample:
I am the lucky owner of several vintage needlework books (1920s) and took some time out to read the insertion stitch sections. The stitches were traditionally used on lingerie and household linen. Many of them looked complex and time consuming!
I decorated strips of felt with snips of fabrics and threads and bonded them with net or organza.
The stitches I trialled from top are:
1. Slanted antique insertion (stranded cotton)
2. Herringbone insertion (perle 5)
3. Beaded insertion (fine perle)
4. Plaited insertion (coton a broder)
                                            5. Buttonhole insertion (medium perle)
                                            6. Laced insertion (perle 3 and stranded cotton)
                                            7. Knotted insertion stitch (cotton a broder)
                                            8. Straight insertion stitch

I haven't done anything like this before so followed the instructions closely, tacking everything to brown paper.   I was pleased with my stitching but felt the bonded strips were too 'busy' against the intricacy of the stitches. I particularly liked mastering the plaited insertion stitch - its not perfect but I'm sure it will improve with practice!

Machine insertion stitches:
There are many stitches on my machine that use a left/right needle motion that can be used to join two adjacent pieces of fabric. They obviously provide a much more uniform effect.
From top:
1. Heavy cross stitch
2. Decorative zig zag
3. Feather stitch
4. Feathered chain stitch
5. Herringbone stitch
All stitching was completed with machine embroidery rayon.


Simple Counterchange Sample:  I learnt to make felt at a workshop in Stroud years ago and thought this
was a good opportunity to use my Merino tops! The felt was lovely; blended purple and pinks and for my second piece I chose a dark purple from my readymade stash. My decision to bond the latter with lilac spider net and snippings, gave it an interesting texture BUT made it too similar in colour to the handmade piece. Looking at  the finished article it is difficult to see where the changed pieces are! The choice of sheers is really interesting as it has an almost optical mixing effect,
changing shades with quite unexpected results.


Friday 27 April 2012

Chapter 9 Samples 4 and 5

Sample 4 Slashed Applique
Worksheet (A4)
Slashed Applique Close Up
14cm x 14cm
Again, it was exciting to try out a new technique. I'd seen this method used in historical costuming at an exhibition in Stratford and knew that a sumptuous textured effect could be obtained. Because I chose fabrics that frayed easily, I worked the edges with the blades of tiny scissors, quite easily. I had visited Janners, a silk mill in Suffolk, about two weeks ago and bought lots of natural textured silk in their sale. I dyed this piece purple and it became almost fluffy as it shredded. The fibres are all slightly different; from the metallic strands to the matt threads of muslin. It was a really satisfying exercise with a soft abstract outcome.

Sample 5 Ripple Applique
Worksheet (A4)

Ripple Applique Close Up
14cm x 14cm
Initially I wondered whether the shape I'd chosen was too complex but decided to cut away on both
sides of the top yellow linen, to reveal the collage of colours underneath. I actually accidentally burnt a patch of organza away when I was pressing the finished piece, but it was serendipitous as a piece of green muslin simply appeared beneath. It would be interesting to try this with a soldering tool!

Chapter 9 Reverse Applique

Sample 1 Mola Worksheet
(A4)
Mola Close-Up
(17cm X 15cm)

I have seen examples of Mola in museum collections and was enthusiastic about attempting a new technique. Looking at the elaborate efforts
produced, I can only marvel at the skill of the needlewomen! This took me a couple of evenings to hand stitch and a lot of patience.... It requires a good light and considerable dexterity to turn corners and stitch evenly and neatly. For a first attempt, I was fairly pleased but in retrospect wished I'd chosen a more vibrant colour palette.


Samples 2 and 3 Contemporary
Worksheet (A4)

Sample 2 Close up
12cm x 12cm


Sample 3 Close Up
12cm x 12cm


This method was certainly a lot speedier than the previous one! (I read that when sewing machines were introduced to Panama, they were ignored by embroiderers who preferred to produce their mola by hand.....a genuine labour of love!!! I decided to follow Sians advice about printing on to fabric to produce the top and bottom patterned layer on the respective pieces. I used a pad underneath each piece and finished up with a much lighter, almost shadowy imprint which was easier to overlap. I like the different pink/plummy tones in Sample 1 and the matt/shiny contrasts of the different edges. With sample 2, I used 6 layers and particularly liked how some of the bonded fibres trapped between the top and second layer peeped out of the edges. The changes in depth perception made for an interesting concept.

Tuesday 17 April 2012

Chapter 8 Complex Samples 5 and 6

Complex sample 5
Sample 5 Worksheet

The inspiration behind this piece was the furled petal shape of a flower on the initial photographic collage of star shapes. I padded the centre and then bonded it to the finished
piece. I think a second round of petals perhaps of transparent fabric would have been interesting. The eight sided star layer machined on top was completed in a strong fuschia pink but against the yellow looks red!

I enjoyed using a new set of 'dabber' type
tiny stamps to overprint my hand dyed
cotton for this piece. Although I used a specialist metallic thread machine needle, I really struggled with the Madeira metallic thread I machined with. It seemed to split and bunch and I spent along time unpicking and playing with tension to achieve a reasonable
stitch. The centre shape is padded and I've discovered some fabrics lend themselves more easily to this technique.


Wednesday 11 April 2012

Chapter 8 Complex Sample 4

Sample 4 Close Up
Sample 4 Worksheet
 I selected 2 variations of my Estoile cut outs from
Chapter 4 and played around layering them in varying orientations. I wasnt initially very sure about my colour choices- too similar? BUT because all the fabrics had differing degrees of sheen, I liked the subtle textured effect that resulted. The shot silk tafetta in the very centre was a wondeful plum/black
colour but cut into a small piece, this effect was lost.